


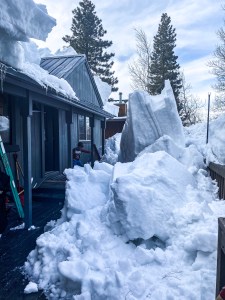
800” of snow last winter didn’t bode well for our deck. One afternoon I was inside (thankfully!!) and heard a thunderous rumble only to look out the window and see an iceberg size chunk of snow shed right onto our front deck. I opened the front door and seeing a jumble of deck railings in the pile, I knew it was done for. Fast forward 6 months later and we have a brand spankin new deck and a few weeks spare before the inevitable first snow fall. It took us a few months, there were some highs and lows, and after reflecting on the whole process there 3 things that everyone needs to know. I’m not talking fundamentals like understanding building codes, structural components or foundation. I am no expert and am in no position to provide building advice. However, these 3 tips are things that I didn’t know going into the process and are so helpful to know before you take it on. So, let’s dig in!
Not all Wood is Created Equal
Not all wood is created equal. I wanted to save some money so I got our redwood from Lowes instead of the local lumber yard. There were a lot of good pieces, but also a lot of bad. Bad meaning that some boards were cracked, warped, or crooked. We saved about 1k on the “cheaper” lumber but 1.) we had to make extra trips back to the store to return some 2) we had to make some cut/design adjustments to make the boards work. Was it worth it? I’m not sure. What I want you to know is, you have options. You can go with a reputable lumberyard that provides high-quality, well-seasoned wood at a higher cost that will likely contribute to a smoother building process, or you can save some money on a product that does the job but may give you some trouble.
Let Your Wood Sit a Few Weeks Before Applying Stain
I am a “check it off the list” kind of girl. So naturally as soon as the final board was screwed in, I wanted to finish it off with the stain. But I am SO glad we waited 4 weeks, and here’s why. When the redwood was first delivered it was more like pink wood, and I had a knot in my stomach feeling that I had made the wrong choice. But after just a few days, the sun started working its magic. The wood dried thoroughly and the color slowly deepened. After a few weeks, it had aged and weathered enough to reveal its natural hue, which then allowed us to choose the right stain to complement the tone. If we had applied the stain right away to potentially damp wood it may have trapped moisture and prevented the stain from properly penetrating and adhering to the wood fibers. We also may have ended up choosing a stain which color changed drastically as the wood dried.
Using the Right Tools is Key if You are DIYing
Before I got over my fear of power tools, I used to hand saw a lot. I had my little hand saw with the plastic guide and it took forever to do anything. Once you start using tools that make the job easier, you realize how much time and frustration you can save verses going with something you are more comfortable with. For this deck job, there are a few tools that were critical to the project. 1.) A framing nailer. Trust me, when you have 16 joists and blocking you do not want to be hand nailing the supports together. 2.) A chalk line. This nifty little tool creates a temporary line so you can screw in the deck boards in an even pattern. You might think you can eyeball it, but after 6 screws you’ll realize the line starts to lean and it will drive you crazy every time you walk on that deck. Pro tip: Go light on the amount of chalk so you can wipe it away easily. 3.) A router. This is not necessary for the job, but if you want your deck to look pro level, you’re going to want a router. This little power tool will allow you to soften the sharp edges of the deck boards to give you a finished and polished look.
Alrighty friends, that’s all I got for you! If you have specific questions, consult a professional. My hope is that this information will save you some time and effort if you are planning to build a deck in the near future. If you found it helpful, I’d love to hear below!

2 responses to “3 Things You Need to Know Before Building a Deck”
-
Trying to find out more about your railing system on your deck. How did you make or where did you purchase the metal system?
-
Hi! They are hogwire panels and a track system, from home depot. Here is the link: https://rstyle.me/+ados3pqqq6FB1lIzYMYDxA
-


Leave a Reply