


For my first tile install, I choose to do a small backsplash in my mudroom. It was an inconspicuous location (in case I screwed up) and there were no outlets or awkward angles meaning less cuts. I went with a subway zellige tile, knowing their irregular shape and texture would help conceal any errors. I have to say, the backsplash turned out better than I expected and was a relatively simple process. I will walk you through each step so you too can conquer your first tile job!
Materials & Tools
- Sponge and clean water
- Measuring tape
- Pencil
- Tile sealer
Prep Work
Clean surface. I started by wiping down the wall to remove any dust and debris. My surface was pretty level but if you are working with an uneven surface, you’ll want to sand down high spots or fill low spots with a filler so the tiles are installed evenly.

Layout tile. The tiles I used had a lot of color variation. To ensure an even distribution of color, I sorted the tiles into the different color tones. I also did a dry-lay of the tile layout on the floor. To do this, I measured the height and width of the wall and marked an outline on the floor and then laid out the tiles in the color pattern I wanted. Doing this also helps you to know how many cuts you’ll need to make down the road.
Apply Mortar
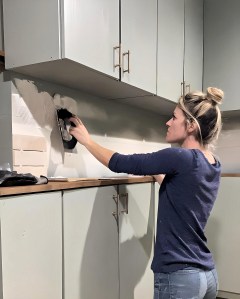
Using a pre mixed mortar eliminated an extra step making the process a bit easier. I applied it in small sections using a 1/4″ notched trowel. I held the trowel at a 45-degree angle to create ridges in the mortar. This helps the tiles adhere better because there is an even distribution of mortar under each piece.
Set the Tile

Place tiles. Going off my layout, I pressed each tile firmly into the thin-set mortar.
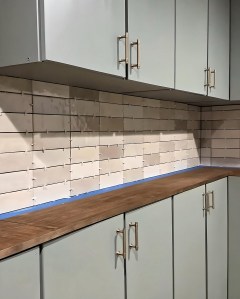
Use spacers. I used 1/8″ spacers between each piece. Tile spacers come in different sizes so you can choose one based on how thick or thin you want your grout lines. I wanted even grout lines, but a lot of people prefer to place zellige tiles closely together to highlight their organic shapes, resulting in minimal grout lines

Cut tiles. I only needed to do straight cuts for the edges, so I used a manual tile cutter and it worked great. Pro tip- This is a great thing to buy used! I found mine for $50 on facebook marketplace.
Allow Mortar to Set
I let the thin-set mortar cure for 24 hours before grouting. This waiting period is critical because this is when the mortar hardens for a strong bond between the tile and the wall. It prevents the tiles from shifting and creates a stable surface for grouting.
Grout the Tiles

Like the mortar, I also chose to go with a premixed grout to make the process easier. I picked a color similar to the tile because I didn’t want a strong contrast. But choosing a darker/lighter grout than the tile is appealing to a lot of people since it can have more dramatic look.

I used a rubber grout float to spread grout over the tiles, pressing it into the spaces between the tiles. After grouting a small section, I wiped the excess with a damp sponge before it had a chance to dry. You’ll want to rinse the sponge frequently and be careful to avoid removing grout from the joints.
Final Clean & Sealing
After letting the grout set a bit, I wiped it down a few more times to remove grout haze and then waited another 24 hours for the grout to fully cure. Lastly, I sealed the tiles just to give it some extra protection. Curing time and sealing are especially important if you are adding a backsplash in an area with water exposure.
I hope you find this information useful, and it fills you with confidence to take on this DIY! As always, I want to conclude by saying that I am not a professional tile installer. I am a DIY home renovator and designer and am sharing the things I have learned in my renovation journey. If you have specific questions, it is always best to consult a professional.
If you have any comments, feedback or questions I’d love to hear below!

Leave a Reply