


Painting kitchen cabinets can be seriously intimidating, but it can also save you some serious money. My last client that purchased new kitchen cabinets for their small gally kitchen paid 20k. If you opt to paint them yourselves, you can come in under 1k, including the cost of equipment that you will have for future projects. If you aren’t sure painting is the right step, I have a video that can help you decide when to paint cabinets vs. when to replace. But if you’re here, it’s probably because you have already thought about painting your cabinets and want to know the next steps. So let’s dig right into the process!
Equipment & Materials
- Sander
- 120 grit sandpaper
- Painters tape
- Painters plastic
- Paintbrush
- Primer- Zissner Shellac
- Paint- Sherwin Williams emerald enamled
- Paint sprayer (Graco Trucoat 360)
Step 1: Sanding & Cleaning


The most annoying step, but critical to a lasting finish! The good news is you don’t need to sand all the way down. You want to do it enough so it roughs up the surface which will help the primer adhere better. Hand sanding is best for the crevices, and I use a sander for the flat surface.
After sanding, you need to need to thoroughly clean all dust and debris. I like to wipe everything down with a wet rag to get the bulk of the dust, and then spray and clean with a multipurpose cleaner.
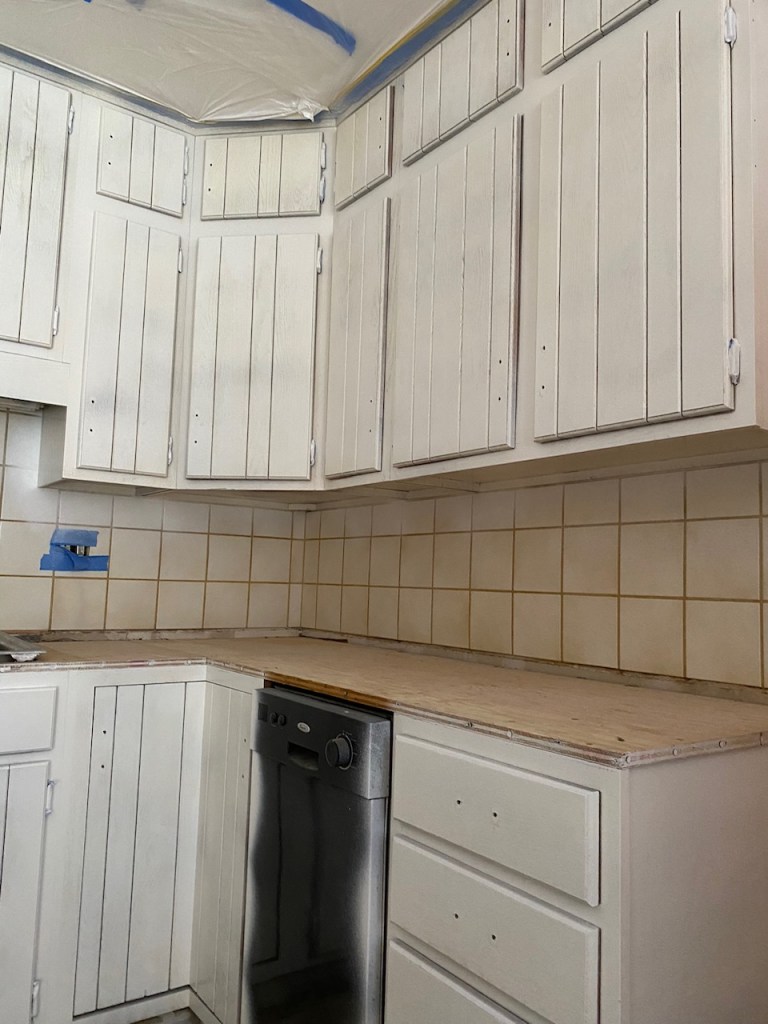
Step 2: Prep for Spraying


The prep for spraying takes far longer than the actual spraying itself. But getting an even smooth finish is definitely worth it on something that you will be looking at everyday. If you are not removing the cabinet doors, you should at least remove the pulls & knobs, and tape all of the door hinges. Tape the edges of the cabinets where they meet the wall and then cover the walls and ceiling with the painters plastic. The sprayer will omit a dust so you want to cover everything at least 3 feet outside of the cabinets. If your room layout allows, you can use the painters plastic on the ceiling to close off the kitchen to create a sealed painting room.
Step 3: Prime and Paint
I apply 1 coat of primer, and let it dry a full 24 hours. Then I apply 2 coats of paint and wait a few hours in between or until it is mostly dry.
A sprayer produces a smooth and even finish, free of brush strokes or unevenness from a roller. I have used this sprayer for years and it works great for furniture and single rooms. (For bigger projects I use this one. I did my whole exterior and interior with this.) If you have not used a sprayer before, here are some tips:
- Test it out on some scrap material before starting on the cabinets.
- Start out on the low setting to get a feel for the flow. A heavy spray can lead to an uneven coat and dripping.
- Hold the sprayer 10″ away from the surface to start, then once you get comfortable with the flow you can go 6-8″.
- Spray in a side to side motion. You can do one line, release the spray, and start another. Or you can spray in a continuous movement going from left to right, and right to left, like in the video above.
- Knocking it out in one coat is not always the goal. Multiple lighter coats will have a more even finish than one heavy coat.
I have found Zissner primer to be the BEST on all my projects. This primer is expensive, but trust me, a high-quality primer will make the difference between paint adhering and scraping off with a fingernail. This one is potent, so you’ll want to wear a mask when applying it. For the best results, you will want to let it dry a full 24 hours before you start on the paint.
I always use the same type of paint for furniture, cabinets, doors or anything that will be bumped or banged against, Sherwin Williams emerald enameled. It is water based which resists yellowing and can be applied on the primer I just shared. This paint has additives that create a hard durable finish that withstands the wear and tear of frequently cleaned and used areas.
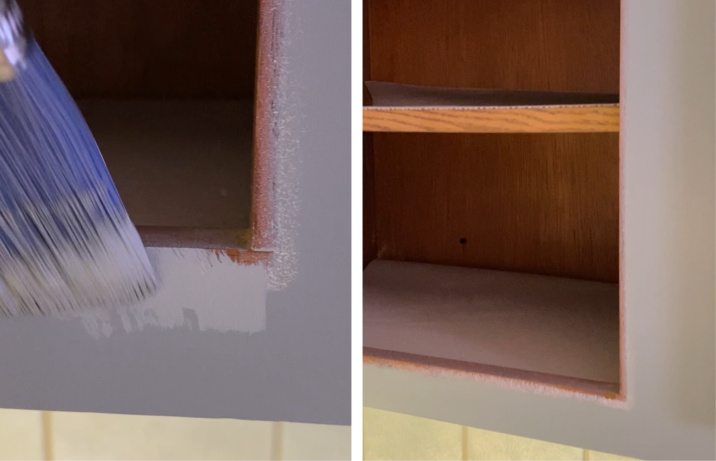
Here is a question I get asked a lot. Do I leave the cabinet doors on, or remove and spray them separately? And here is what I have to say about this. I leave the doors on. HOWEVER, I am very careful to spray lightly where the door meets the cabinet frame, so there is no paint line. If you spray too heavy, there will be a line when you open the cabinet door. I remove all the items from inside the cabinet so it’s empty, but with the door on, it’s not necessary to tape off the interior. After spraying, I use a small paintbrush to touch up the area around the hinges and inside the door.
The alternative is to remove the doors and hinges, tape off the interior of the cabinet, and spray the doors separately. You will still need to tape off the hinges (unless you remove them completely, but I am always hesitant to do this because sometimes it doesn’t line up the same when I put them back on.) I don’t think either way is right or wrong, or one is faster than the other.
Step 4: Touch up.
The bulk of the cabinet surface will be painted with the sprayer. But there is always touch up needed once you remove the tape. I use a small craft paintbrush to clean up the edges against the walls and to get any little crevices. I use a foam roller on the interior of the cabinet door.
Step 5: Hardware
After all that work, you might be excited to get some new hardware for a fresh updated look. But don’t toss the old hardware yet! Make sure you can find an alternate hardware that will fit in the predrilled holes. Common spacing is 3″ and 5″ but sometimes old cabinets have hardware that is not a standard size and it can be difficult to find a replacement. If that’s the case, you can always consider refinishing or painting the old hardware.

To Seal or Not to Seal?
Whether or not you apply a topcoat on your cabinets depends on several factors, like what paint you used and your desired outcome. If you use the Sherwin Williams emerald enameled paint, you don’t necessarily need to apply a sealer topcoat. This paint is water based and already has hardening properties in it. If you want an extra layer of protection, a water-based polyurethane will provide just that. I have used this product many times, minwax also has a water-based option.
Before & After


I hope you find this information useful, and it fills you with confidence to take on this DIY! As always, I want to conclude by saying that I am not a professional painter. I am a DIY home renovator and designer and am sharing the things I have learned in my renovation journey. If you have specific questions, it is always best to consult a professional.

Leave a Reply